A well-adjusted clarinet reed can make or break your performance. Even skilled players struggle when their reeds are not properly prepared, with studies showing that reed issues account for nearly half of tone and response problems in new clarinetists. Whether you are aiming for a richer sound or smoother articulation, knowing how to prepare and adjust your reed is essential. This guide shares proven steps and practical tips so you can get the most from every reed.
Table of Contents
- Step 1: Prepare Tools And Select The Right Reed
- Step 2: Inspect Reed For Imperfections And Symmetry
- Step 3: Adjust Reed Tip And Rails For Balance
- Step 4: Modify Reed Thickness For Desired Response
- Step 5: Test Reed Performance On Your Clarinet
- Step 6: Fine-Tune Adjustments And Confirm Quality
Quick Summary
| Key Point | Explanation |
|---|---|
| 1. Gather essential tools for reed making | Proper tools include fine grit sandpaper, a razor blade, and good lighting to ensure precise adjustments. |
| 2. Inspect reeds thoroughly for imperfections | Check for symmetry, rail evenness, and possible weak spots using backlighting for optimal sound quality. |
| 3. Make incremental adjustments to reed thickness | Thinning specific areas enhances flexibility; avoid over-sanding to maintain structural integrity. |
| 4. Test reed performance consistently | Play sustained notes and scales, assessing tonal consistency and adjusting based on observation during play. |
| 5. Refine adjustments with patience | Small changes can make a big difference; compare against initial performance and be prepared to start over if necessary. |
Step 1: Prepare Tools and Select the Right Reed
Successful clarinet reed adjustment begins with gathering the right tools and selecting an ideal reed for your instrument. According to Clarinet.org, professional musicians require specific equipment to ensure high quality reed preparation.
Your essential tools will include a flat glass surface, fine grit sandpaper, razor blade or reed knife, reed clipper, reed rush, ruler, and good lighting. When selecting a reed, look for consistent grain structure and avoid reeds with visible imperfections like knots or uneven coloration. Professional reed makers recommend inspecting multiple reeds and selecting those with uniform density and tight wood grain patterns.
A critical tip from Clarinet.org is to always keep your tools clean and well maintained. Dirty or damaged tools can compromise reed quality and potentially damage your expensive cane material. Store your reeds in a protective case that maintains consistent humidity and prevents warping.
![]() In the next step, we will explore precise techniques for initial reed preparation and adjustment.
In the next step, we will explore precise techniques for initial reed preparation and adjustment.
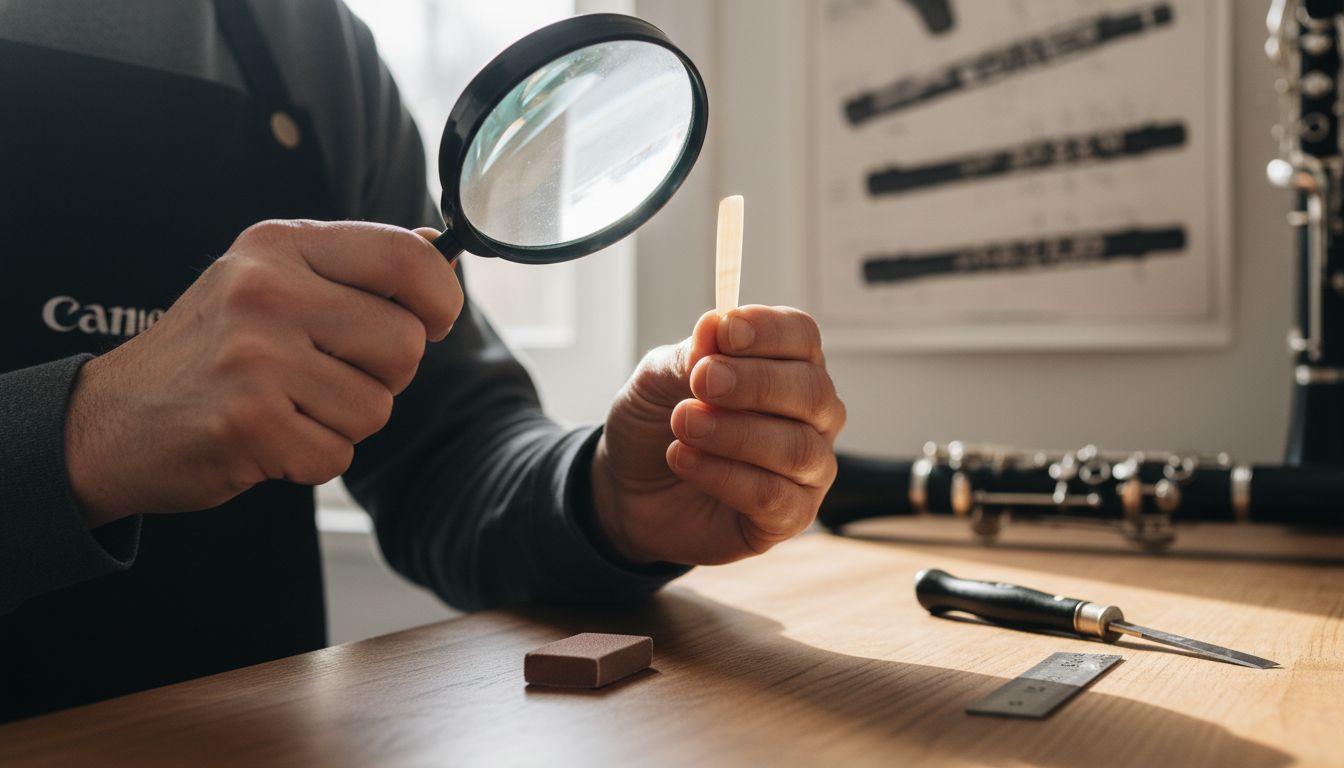
Step 2: Inspect Reed for Imperfections and Symmetry
Detecting and addressing reed imperfections is crucial for achieving optimal sound quality and performance. According to Texas Band Masters Association, careful reed inspection can significantly improve your clarinet playing experience.
Begin by examining the reed against a flat light surface to identify potential issues. Look for symmetry across the entire length of the reed carefully checking the tip thickness, rail evenness, and overall fiber structure. The Clarinet.org recommends using a backlight technique where you hold the reed up to bright light to reveal subtle variations in thickness and potential weak spots.
Warning signals include uneven edges, visible grain disruptions, or areas that appear significantly thinner or thicker than the surrounding material. Professional musicians suggest rotating and examining the reed from multiple angles to ensure comprehensive assessment.
 Slight imperfections can often be corrected through careful sanding or adjustment techniques. In the next step, we will explore precise methods for fine tuning your selected reed to achieve optimal resonance and playing comfort.
Step 3: Adjust Reed Tip and Rails for Balance
Balancing your clarinet reed is a precise art that directly impacts sound quality and playing comfort. According to Clarinet.org, Dr. Laura Armstrong emphasizes that careful tip and rail adjustment is fundamental to achieving optimal reed performance.
Begin by using fine grit sandpaper on a flat glass surface to make incremental adjustments. Focus on creating symmetry along the reed rails working slowly and carefully to maintain an even thickness. The key is making minimal modifications that preserve the reed’s natural vibration characteristics. Clarinet.org recommends using gentle strokes and checking your progress frequently under good lighting to ensure uniform refinement.
A critical warning is to avoid over sanding which can compromise the reed’s structural integrity. Professional musicians suggest making quarter turn rotations and light passes with sandpaper rather than aggressive adjustments. Small precise movements will help you gradually reshape the reed without destroying its fundamental playing qualities.
In the next step, we will explore final testing techniques to verify your reed adjustment has improved overall sound and responsiveness.
Step 4: Modify Reed Thickness for Desired Response
Precise reed thickness modification can dramatically transform your clarinet’s sound and playing characteristics. According to Clarinet.org, Dr. Laura Armstrong emphasizes that strategic thickness adjustments allow musicians to customize their reed’s performance to match their unique playing style.
Start by identifying the areas requiring modification using gentle pressure and careful observation. Focus on thinning specific regions to enhance flexibility and response. Clarinet.org recommends using extremely fine grit sandpaper or a precision reed knife to make microscopic adjustments. Work slowly across the reed surface concentrating on the heart and tip areas where subtle changes can significantly impact vibration and tone production.
A critical warning is to approach thickness modification with extreme caution. Removing too much material can compromise the reed’s structural integrity and playing quality. Professional musicians suggest making incremental adjustments test playing between modifications and allowing sufficient time to evaluate the reed’s response. Your goal is to achieve a delicate balance that enhances the reed’s natural characteristics without fundamentally altering its core performance. In the final step, we will explore comprehensive testing techniques to validate your precise reed modifications.
Step 5: Test Reed Performance on Your Clarinet
Testing your reed on the clarinet is the ultimate validation of all your careful preparation and adjustment work. According to Clarinet.org, systematic performance testing is crucial for ensuring optimal sound quality and playability.
Begin by playing long sustained notes across different registers to assess the reed’s response and tonal consistency. Pay close attention to how the reed performs during soft and loud passages, listening for any inconsistencies in tone or unwanted vibrations. Clarinet.org recommends performing a series of scale exercises and melodic passages to thoroughly evaluate the reed’s overall performance characteristics.
A critical warning is to avoid making immediate judgments. Professional musicians suggest playing the reed for at least 10 to 15 minutes to allow it to fully settle and reveal its true playing qualities. Clarinet Reed Compatibility Guide can provide additional insights into understanding how different reeds interact with various clarinets. If the reed does not meet your performance expectations after careful testing, you may need to return to earlier adjustment steps or consider selecting a new reed altogether.
Step 6: Fine-Tune Adjustments and Confirm Quality
The final stage of reed adjustment requires meticulous attention to subtle nuances that separate good performance from exceptional sound quality. According to Clarinet.org, precise fine-tuning is the hallmark of professional reed preparation.
Carefully compare your adjusted reed against your initial baseline by conducting systematic sound tests. Clarinet.org recommends creating a methodical evaluation process that includes playing soft melodic passages soft dynamic ranges and challenging technical passages to fully assess the reed’s responsiveness. Focus on detecting any remaining asymmetries or resistance points that might compromise your playing experience.
A critical warning is to maintain patience during this final refinement stage. Professional musicians understand that microscopic adjustments can dramatically impact overall reed performance. If the reed still does not meet your exacting standards after multiple careful modifications you may need to start the process with a new reed. Examples of Clarinet Reeds can provide additional context for understanding what constitutes an exceptional reed across different playing styles and skill levels.
Elevate Your Clarinet Sound with Precision Equipment and Expertise
Adjusting clarinet reeds for enhanced sound quality takes patience and skill. The challenges of selecting ideal reeds, achieving perfect balance, and fine-tuning thickness can leave even experienced players searching for better tools and guidance. If you want to overcome uneven response, inconsistent tone, or difficulties in reed performance, understanding the right approach is essential. This guide shows you how microscopic changes impact your sound, but having the right mouthpieces, barrels, and accessories tailored to your style makes the difference in reaching your true musical potential.

Discover a carefully curated selection of professional-grade clarinet components at My Clarinet Stuff. Whether you need a custom Gleichweit mouthpiece, a precision barrel, or expert advice to complement your reed adjustments, our boutique solutions rooted in Viennese craftsmanship offer unmatched quality. Take control of your playing experience and hear the transformation today by exploring our custom mouthpieces and barrels that perfectly align with your reed’s optimized setup. Don’t wait to achieve the clarity and expressiveness your music deserves.
Frequently Asked Questions
How can I choose the right reed for my clarinet?
Selecting the right reed involves examining its grain structure for consistency and avoiding visible imperfections. Inspect multiple reeds, looking for uniform density and tight wood grain patterns to ensure optimal performance.
What tools do I need for clarinet reed adjustment?
You will need a flat glass surface, fine grit sandpaper, a razor blade or reed knife, a reed clipper, a ruler, and good lighting to properly adjust your clarinet reeds. Gather these tools to ensure a precise and effective reed adjustment process.
How do I identify imperfections in my clarinet reed?
To identify imperfections, hold the reed against a light source and check for symmetry, tip thickness, and rail evenness. Look for signs like uneven edges or visible grain disruptions, which can affect sound quality.
What steps should I follow to adjust the tip and rails of my reed?
Start by using fine grit sandpaper on a flat surface, making incremental adjustments to create symmetry along the reed rails. Focus on maintaining an even thickness and use gentle strokes to avoid compromising the reed’s structural integrity.
How can I modify my reed’s thickness for better sound response?
Approach thickness modification by thinning specific areas of the reed to enhance flexibility and tonal response. Use extremely fine grit sandpaper to make microscopic adjustments, testing the reed frequently to find the right balance for your playing style.
What should I do if my reed doesn’t perform as expected after adjustments?
If your reed doesn’t meet your performance expectations, take the time to re-evaluate earlier steps and repeat adjustments. You might need to start with a new reed, especially if it still feels inconsistent after multiple testing sessions.