


The fastest, most reliable approach to reed selection is a short, repeatable routine: pick a sensible starting strength, run a five-step play-test, and adjust in half-step increments based on specific response criteria. Beginners typically start at a soft strength suitable to ease of play, which balances ease of play with enough resistance to produce a stable tone. Experienced players usually open at a slightly stiffer strength, then move from there. That starting point is not a guess — it is the baseline from which your step-by-step reed selection process begins.
Before you play a single note, run these three non-negotiable checks:
- Response: Does the reed speak immediately on a soft attack, or does it require force to start the tone?
- Core tone: Is the sound centered and full, or thin and airy in the middle register?
- Upper-register clarity: Can you move cleanly through the break (clarinet) or into the altissimo (saxophone) without squeaking or cracking?
If all three pass, you have a candidate. If one fails, adjust strength or seating before moving on.
Pro Tip: Keep a small notepad at your stand. Mark each reed candidate with a letter (A, B, C) and jot one word per criterion after each test. After three sessions, the pattern tells you more than your memory ever will.
Key Takeaways
The most reliable reed selection process combines a sensible starting strength, a structured play-test, a gradual break-in schedule, and consistent rotation across 3–5 active reeds.
| Point | Details |
|---|---|
| Start at the right strength | Beginners start at strength 2.0; experienced players open at 2.5–3 and adjust in half-step increments. |
| Match reed to mouthpiece facing | A more open tip needs a softer reed; a closed tip needs a stiffer one. Always re-test when changing mouthpieces. |
| Break in gradually | Begin with 5–10 minutes on Day 1 and increase slowly; limit water soaks to 1–2 minutes maximum. |
| Rotate and log | Keep 3–5 active reeds, track session counts, and log mouthpiece and reed combos by venue and conditions. |
| Myclarinetstuff test box | The Gleichweit Test Box lets you pair mouthpiece tip openings with your reeds at home for faster, evidence-based setup decisions. |
Table of Contents
- How to follow a step-by-step reed selection routine in one session
- What reed strength numbers mean and the filed vs. unfiled difference
- How does mouthpiece tip opening affect which reed strength works best?
- How to break in a new reed so it stabilizes quickly
- Which reed brands suit which players, and should you use cane or synthetic?
- How to visually inspect reeds and pick the best from a new box
- How to diagnose common reed problems and know when to change strength
- Our recommended A/B play-testing protocol for comparing reeds fairly
- Practical habits for keeping reed selection consistent and low-stress
- Pair your reed selection with the right mouthpiece from Myclarinetstuff
- Sources
How to follow a step-by-step reed selection routine in one session
A repeatable selection workflow removes guesswork and protects your embouchure from compensating for a bad reed. Work through these five steps in order.
-
Set up your rig consistently. Seat the reed so the tip aligns flush with the mouthpiece tip — not above, not below. Tighten the ligature to your usual tension. Use the same mouthpiece and barrel you always practice with. Consistency here is the whole point: any variable you change between candidates contaminates the comparison.
-
Choose a starting strength based on experience and tip opening. Most beginners start at strength 2 and progress upward as embouchure and breath support develop. Intermediate players typically land at a moderately stiff strength. If your mouthpiece has a more open tip, lean toward the softer end of your range; a closed tip usually pairs better with a slightly stiffer reed. More on that pairing logic in the mouthpiece section below.
-
Run the A/B play-test sequence. Give each candidate reed roughly 10–12 minutes of structured playing. Use this sequence:
- Long tones (2–3 minutes): sustain each note for 8–10 counts. Listen for evenness and core.
- Octave jumps (2 minutes): move from low register to upper register on the same fingering. Note whether the upper note speaks cleanly.
- Soft-to-loud dynamics (2 minutes): start pianissimo and crescendo to forte on a single pitch. A reed that chokes at soft volumes or goes sharp at loud volumes is a flag.
- Scales and arpeggios (2 minutes): run a two-octave scale at a moderate tempo. Listen for even response across all registers.
- Articulation check (2 minutes): single-tongue a repeated note at 80–100 bpm. The reed should respond cleanly on each attack without popping or going flat.
-
Score each candidate. After the sequence, rate the reed on five criteria: pitch stability, response, tonal core, articulation, and upper-register clarity. Use a simple 1–3 scale (1 = poor, 2 = acceptable, 3 = excellent). A total of 12 or above out of 15 is a keeper. Anything below 9 goes in the discard pile immediately. Short, consistent play-tests focusing on long tones and upper-register checks reveal most useful differences quickly.
-
Adjust in half-step increments. If two or more candidates score below 12, try a reed half a strength up or down. Do not jump a full step — the change is too large to isolate. If the problem persists across multiple reeds at the same strength, the issue may be your mouthpiece facing, not the reed. Check alignment and tip-to-tip seating before changing brands.
A useful companion to this routine is the clarinet reed selection tips guide at Myclarinetstuff, which covers common pitfalls that trip up players at each stage.
What reed strength numbers mean and the filed vs. unfiled difference
Reed strength numbers run on a scale of roughly 1–5, with half-step gradations (1.5, 2, 2.5, and so on) available from most major brands. A higher number means a stiffer, thicker reed that requires more air pressure and embouchure control to vibrate. The critical thing to understand: these numbers are not standardized across brands. A labeled strength can play noticeably harder or softer depending on the manufacturer. Treat strength numbers as relative guides within a single brand, not as universal measurements.
What actually determines how a reed plays? A measurement study found that blank thickness, vamp shape, and cane hardness correlated most strongly with manufacturer strength labels. Tip thickness, despite being the most visible part of the reed, showed little correlation to the labeled strength. That finding matters because it explains why two reeds from the same box can feel completely different — cane is a natural material, and density varies from blank to blank.
The cut of the reed adds another layer of variation:
- Filed (French) cut: The bark is removed from a thin strip just below the vamp. This produces a brighter, more immediate response and suits players who want quick articulation and a more flexible feel. Filed reeds tend to pair well with medium to open tip openings.
- Unfiled (American) cut: The bark remains intact to the base of the vamp. The response is slightly warmer and more resistant, which suits players who prefer a darker tone or use a more closed mouthpiece facing.
Pro Tip: Harder is not better. The right reed is the one that lets you play with a relaxed embouchure and full breath support. If you are biting or squeezing to control the sound, the reed is almost certainly too soft — not too hard — and your embouchure is compensating.
How does mouthpiece tip opening affect which reed strength works best?
Reed selection is dictated largely by mouthpiece design — the facing curve and tip opening determine which strength will vibrate optimally. Change your mouthpiece and you almost always need to re-evaluate your reed strength. This is one of the most overlooked variables in the selection process.
Here is the practical pairing logic:
- A closed or short facing (smaller tip opening, shorter facing curve) requires a stiffer reed. The reed has less room to vibrate, so it needs more mass to resist the smaller gap. As a rule of thumb, if you move to a more closed mouthpiece, try going up half a strength.
- A more open or longer facing (larger tip opening, longer facing curve) needs a softer reed. The wider gap allows more vibration, and a stiffer reed will feel locked and unresponsive. Moving to a more open mouthpiece usually means dropping half a strength.
A quick compatibility test takes about 10 seconds:
- Wet the reed briefly and seat it flush with the mouthpiece tip.
- Play a single middle-register note with your normal embouchure and breath support.
- If the reed speaks immediately and the tone feels centered, the pairing is in range.
- If you need to bite or add significant pressure to start the note, the reed is too soft for that facing. If the reed feels locked and produces a thin, forced tone, it is too stiff.
The clarinet reed compatibility guide at Myclarinetstuff goes deeper on matching specific tip openings to reed profiles, which is especially useful when you are switching between mouthpiece models.
How to break in a new reed so it stabilizes quickly
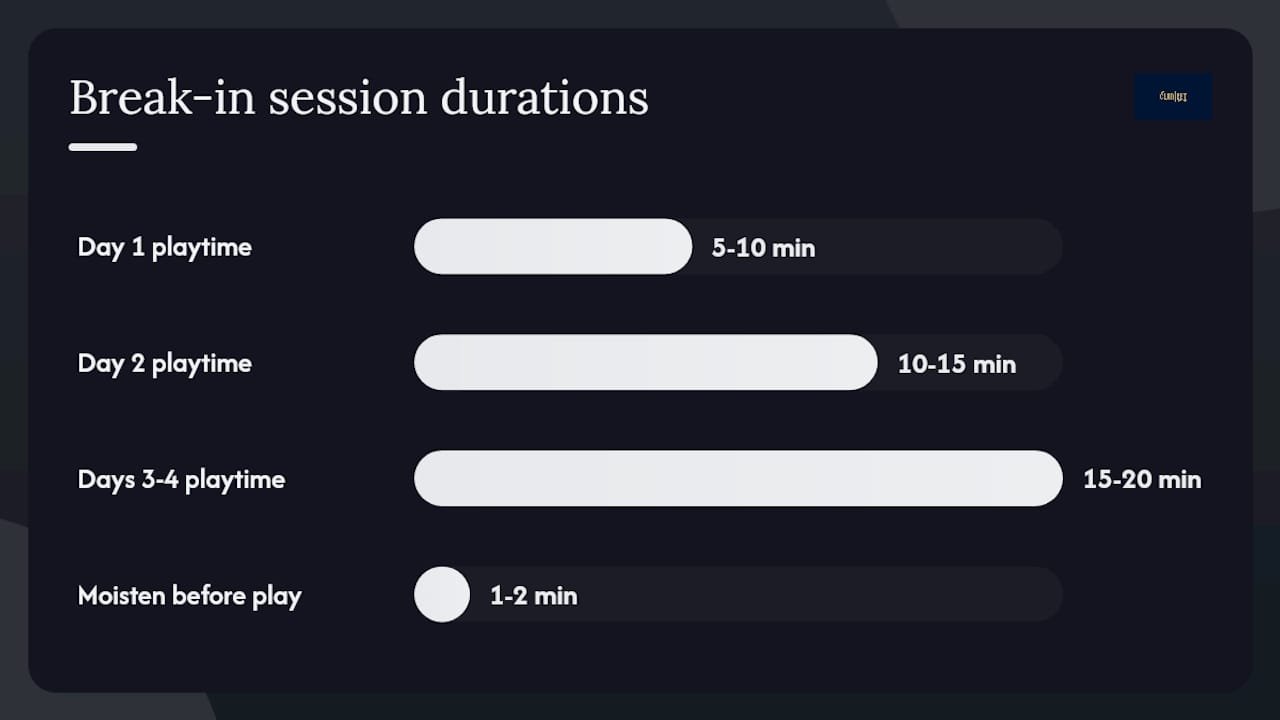
Cane reeds need a gradual break-in to stabilize the fibers. Skip this step and the reed warps, plays inconsistently, or dies within a week. A gradual break-in routine using short, incremental sessions is recommended over long soaks. Here is a practical schedule:
- Day 1: Play 5–10 minutes. Focus on long tones in the middle register only. Let the reed dry flat on a glass or reed holder after playing.
- Day 2: Play 10–15 minutes. Add scales and light articulation. Check for evenness across registers.
- Days 3–4: Increase to 15–20 minutes. Include the full play-test sequence from Step 3 above. The reed should begin to feel consistent.
- Day 5 onward: The reed is ready for full practice. Continue rotating it with 2–4 other reeds to extend its life.
Moistening the reed correctly matters as much as the session length. Manufacturer guidance recommends brief moistening — saliva or a water soak of 1–2 minutes maximum. Do not soak a reed for 10 or 15 minutes before playing; prolonged soaking swells the cane unevenly and accelerates warping.
What to avoid during break-in:
- No oven-drying or forced drying with heat.
- No pressing the reed flat with your thumb while wet — this distorts the vamp.
- No playing at full volume or in the extreme registers on Day 1.
- No skipping the drying step — always let the reed dry completely between sessions.
After each session, check for tone evenness, clean response, and absence of squeaks. When all three are consistent across two consecutive sessions, the reed is stable.
Pro Tip: Keep 3–5 active reeds in rotation and mark each one with a pencil number on the flat side. Limiting daily playtime per reed and tracking usage extends the life of each reed and keeps your feel consistent from day to day.
The clarinet reed care workflow at Myclarinetstuff covers storage, rotation schedules, and care habits in detail for players who want a complete maintenance system.
Which reed brands suit which players, and should you use cane or synthetic?
The cane vs. synthetic decision comes first, because it shapes everything else in your selection process.
Cane reeds respond quickly, produce a warm and nuanced tone, and are the standard for most classical and jazz players. The trade-off is humidity sensitivity, break-in time, and variability from reed to reed — even within the same box. Synthetic reeds are stable in humidity, need no break-in, and deliver consistent feel from the first note. They are the practical choice for outdoor gigs, humid climates, or players who want to skip the break-in process entirely. The tonal character of synthetics has improved significantly, though many players still find cane more responsive in the softest dynamics.
Here are the major brands and who they tend to suit:
- Vandoren: The most widely used cane reed family in the U.S. The traditional cut (unfiled) suits classical players with a darker tone preference; the V16 and Java cuts (filed) are brighter and more flexible for jazz and pop. Vandoren’s strength ratings are considered a reliable reference point for cross-brand comparisons.
- D’Addario (Rico): Rico Royal and Reserve lines cover a wide range of players. Rico Royal is a solid, affordable starting point for students; the Reserve series offers more refined consistency for intermediate and advanced players. D’Addario and Vandoren appear repeatedly as widely used families across player stages.
- Legere: The most established synthetic option. Legere reeds play immediately with no break-in and hold up well in humidity. They run slightly stiffer than their labeled strength suggests, so many players drop half a strength when switching from cane. Best suited to gigging players and outdoor performers.
- Forestone: A Japanese synthetic reed with a cane-like feel that many players find closer to natural response than other synthetics. Available in a range of cuts and strengths. A good option for players who want synthetic durability without sacrificing too much warmth.
- Fibracell: A carbon fiber composite reed with a bright, projecting tone. Particularly popular with saxophone players in loud ensemble settings. Durability is excellent; tonal character is more focused than Legere or Forestone.
- Bari: A softer synthetic option that tends to suit beginners or players who want a more flexible feel. Less common in professional settings but a practical, low-cost entry point for students exploring synthetics.
Synthetic reeds are more stable in humidity and need no break-in, making them a reliable choice for gigging players or outdoor performers.
On cross-brand strength inconsistency: a Vandoren 3 and a Rico Royal 3 do not feel the same. Always re-test when switching brands, even at the same labeled strength. Some manufacturers now offer quarter-strength gradations to help players fine-tune without jumping a full half-step.
Buying by the box: buying reeds by the box increases the chance of getting several playable specimens and is cost-effective. Boxes typically hold multiple reeds depending on the instrument type. When buying in-store, ask to select reeds from the box yourself — this lets you apply the visual inspection below before you even get home.
How to visually inspect reeds and pick the best from a new box
Visual inspection before playing cuts the number of dud reeds you waste time testing. Combine it with a short play-test and you halve the number of unusable reeds you keep in rotation. Here is the checklist:
- Light test: Hold the reed up to a bright light source and look at the vamp (the scraped, translucent area). The heart — the slightly thicker area just below the tip — should be symmetrical left to right. Uneven density on one side almost always produces an uneven tone.
- Vamp surface: The scraped area should be smooth, with no rough patches, gouges, or visible fiber separation. A rough vamp often means the reed will be inconsistent across registers.
- Cane fibers: Look for straight, parallel grain lines running the length of the vamp. Wavy or irregular grain suggests uneven density, which translates to unpredictable response.
- Rails and tip: Check that the side rails (the thin strips along each edge of the vamp) are even in width. A thicker rail on one side creates an asymmetric seal against the mouthpiece table. The tip should be thin, even, and free of chips or cracks.
- Flat side: The back of the reed should be completely flat. Any warping or curvature here means the reed will not seal properly against the mouthpiece table.
Pro Tip: Even a reed that passes every visual check can still underperform. Set aside any reed that looks good but feels wrong after two full break-in sessions. Some cane simply does not respond well regardless of appearance. Trust the play-test process over visual inspection alone.
How to diagnose common reed problems and know when to change strength
Most reed problems have a specific cause and a specific fix. Work through the symptom before reaching for a new reed.
When to move up in strength: your tone feels airy or unfocused despite good embouchure support, you are consistently sharp in the upper register, or soft dynamics feel unstable and thin.
When to move down: you are biting or squeezing to control the sound, articulation feels sluggish, or the reed feels locked and unresponsive from the first note.
When to change brand or cut rather than strength: the tonal character is consistently wrong (too bright, too dark) even at the right resistance level. That is a cut or material issue, not a strength issue. A filed reed will always be brighter than an unfiled reed at the same strength — switching cuts is often faster than chasing the right tone through strength adjustments alone.
A reed is beyond saving when it has a visible crack, a permanent warp that does not correct after drying flat, or when it consistently scores below 9 on the play-test scoring system across three sessions. Retire it and move on.
Our recommended A/B play-testing protocol for comparing reeds fairly
A structured A/B protocol removes the bias that comes from testing reeds in a random order or on different days. Here is a reproducible method you can use to compare two reeds or two mouthpiece setups.
The protocol:
- Label two reeds A and B. Do not mark which brand or strength each is — test them blind if possible.
- Use the same mouthpiece, ligature, and ligature tension for both. Do not adjust anything between reeds.
- Run a consistent 3-minute warm-up (long tones, middle register only) before testing either reed.
- Play the five fixed exercises from Step 3 of the selection routine: long tones, octave jumps, soft-to-loud dynamics, scales, and articulation. Spend exactly 2 minutes on each.
- Score each reed immediately after its sequence using the five criteria: response, intonation, tonal core, articulation, and upper-register clarity (1–3 per criterion, 15 points total).
- Randomize the order across sessions — test A first in session one, B first in session two.
Score sheet template:
Run the comparison across three sessions before making a final decision. A reed that scores consistently higher across all three sessions is the clear choice. If scores are within two points of each other across sessions, either reed is acceptable and personal preference can decide.
Pro Tip: Involve a teacher or a trusted listener for at least one session of the A/B test. You hear your own playing from inside your head; they hear what the audience hears. A calibrated outside ear often catches tonal differences you cannot perceive yourself.
The mouthpiece selection tips guide at Myclarinetstuff applies the same A/B logic to mouthpiece comparisons, which is the natural next step once your reed selection is dialed in.
Practical habits for keeping reed selection consistent and low-stress
Consistent reed selection is less about finding the perfect reed once and more about building habits that keep your setup predictable week to week.
Daily habits worth keeping:
- Rotate through 3–5 active reeds. Never play the same reed two sessions in a row.
- Mark each reed with a pencil number on the flat side and note the session count. Replace reeds based on usage, not calendar days — a reed played 20 sessions is worn regardless of how old it is.
- Store reeds flat in a reed holder or case, not in the original plastic sleeve. Flat storage prevents warping between sessions.
- Run a 2-minute long-tone warm-up check at the start of every session. If a reed that passed yesterday feels wrong today, set it aside and try the next one in rotation. Do not spend the whole session fighting a reed.
Logging reed and mouthpiece combos: Keep a simple log — a notes app or a small notebook works fine. Record the reed brand, strength, and cut alongside the mouthpiece model and tip opening. Note the venue or conditions (humid outdoor gig, dry rehearsal room) and how the setup performed. Over time, this log tells you which combinations hold up in which environments, which is far more useful than any general recommendation.
When a reed starts to feel consistently dull, loses its upper-register clarity, or requires noticeably more effort to produce the same tone, it is ready to retire. Most cane reeds have a useful life of 2–4 weeks under regular practice conditions, though rotation extends that range considerably.
Pair your reed selection with the right mouthpiece from Myclarinetstuff
Getting your reed selection right is only half the equation. The mouthpiece you pair it with determines how much of that reed’s potential you actually hear.

Myclarinetstuff offers the Gleichweit Test Box program — an at-home trial service that lets you test multiple Gleichweit mouthpieces with different tip openings alongside your current reeds before committing to a purchase. Because tip opening directly determines which reed strength plays best, testing mouthpieces and reeds together at home shortens the pairing process considerably. You get to hear the actual combination in your own space, with your own embouchure, rather than guessing from a spec sheet. Visit the Gleichweit Test Box page to choose the tip-opening range that fits your current setup and start narrowing your reed and mouthpiece combination with real playing data.
Sources
The claims in this guide draw from the following sources. Each is worth reading directly if you want to go deeper on a specific aspect of reed selection.
- Understanding Reeds for Clarinets and Saxophones – Grosse Pointe Music Academy
- The right clarinet or saxophone reed strength “for you” | Bret Pimentel, woodwinds
- How to select a clarinet reed — JennyClarinet
- Saxophone and Clarinet Reeds – Beginner Guide – SoundUnlimited
- Clarinet
- Selecting saxophone reeds for classical and jazz performance — BandWorld / McGee