


A clarinet reed is a thin piece of Arundo donax cane (or a synthetic polymer alternative) that vibrates against the mouthpiece table and generates every note you play. Without it, the clarinet is silent. With the wrong one, even a great mouthpiece fights you. The single most important decision you face is matching reed strength to your mouthpiece’s tip opening: a closer tip generally needs a harder reed, while a more open tip usually pairs better with a softer one. Vandoren publishes tip-opening charts that make this pairing concrete.
Here is what to do right now:
- Pick a starting strength. Beginners typically start at a moderate reed strength suitable for their mouthpiece tip opening, often around the middle of the common range.
- Buy a box, not a single reed. Natural cane varies; you need 3–4 reeds in rotation from day one.
- Soak briefly with water (not saliva) for 30–60 seconds before your first play, then limit that first session to 5 minutes.
- Choose your material. For traditional tone and the widest brand selection, start with cane (Vandoren Traditional or D’Addario Organic Reserve). For low-maintenance consistency and no break-in ritual, a synthetic reed is a practical alternative.
Key Takeaways
Matching your reed strength to your mouthpiece tip opening, rotating 3–4 reeds through a proper break-in schedule, and storing reeds with humidity control are the three habits that produce consistent, reliable reed performance.
| Point | Details |
|---|---|
| Match reed to mouthpiece | Closer tip opening needs a harder reed; open tip needs a softer one. Start at the manufacturer’s recommended strength and adjust by half-steps. |
| Rotate and break in properly | Use 3–4 reeds in rotation; limit Day 1 to 5 minutes of play and build gradually over 5 days. |
| Control humidity | Store reeds with a Boveda 49% or 62% pack in a hygro case; target moderate relative humidity to prevent warping and mold. |
| Adjust conservatively | Sand rails or thin the tip one micro-step at a time and play-test after each change. Over-correction is irreversible. |
| Use Myclarinetstuff’s matchmaker | The Clarinet Mouthpiece Matchmaker at Myclarinetstuff helps align your tip opening, facing, and reed strength for a setup that works together. |
Table of Contents
- What is the reed on a clarinet, and how does it produce sound?
- Reed anatomy and inspection vocabulary every player should know
- How environment and equipment change the way a reed feels
- How to choose the right reed: strengths, cuts, and a testing routine
- Does mouthpiece geometry actually determine reed strength?
- How to break in new reeds without damaging them
- How to care for and store reeds to extend their life
- Placement and assembly: how to mount a reed correctly
- Simple adjustments and safe repairs: sanding, paring, and clipping
- Making clarinet reeds by hand: what it involves and whether to try it
- Common reed problems and how to diagnose them quickly
- Practical product recommendations for U.S. players
- What I tell every student about reeds
- Guided mouthpiece and reed matching through Myclarinetstuff
- Sources
What is the reed on a clarinet, and how does it produce sound?
The reed sits on the flat table of the mouthpiece, held in place by the ligature. When you blow air through the instrument, the reed vibrates rapidly against the mouthpiece’s facing, alternately opening and closing the gap between its tip and the mouthpiece tip rail. That rapid oscillation sets the air column inside the clarinet vibrating, which produces pitch. The frequency of vibration determines the note; the character of that vibration shapes your tone.
Most reeds are cut from Arundo donax, a giant Mediterranean cane grass. Its cellular structure, when split and profiled correctly, produces the right combination of stiffness and flexibility for a clarinet reed. Cane quality and cutting precision account for much of the variation you feel from one reed to the next, even within the same box.
Synthetic reeds use polymer materials engineered to mimic cane’s flexibility. They skip the break-in process entirely, resist humidity changes, and last considerably longer than cane. The trade-off is a slightly different feel and, for many players, a tone that sits just outside the warmth of good cane. Neither is universally better; they solve different problems.
Strength is the practical measure of a reed’s stiffness and resistance. A softer reed (1.5–2) vibrates easily but can feel unstable or airy. A harder reed (3.5–4+) offers more resistance and projection but demands a more developed embouchure to respond cleanly. Strength numbers are not standardized across brands: a Vandoren 3 and a D’Addario 3 are close but not identical in feel.
Filed vs. unfiled refers to whether the manufacturer has removed the bark from the area just below the vamp (the “file line”). Filed reeds (sometimes called French-cut) respond faster and feel more flexible, which suits players who want immediate articulation. Unfiled reeds retain the bark, which adds resistance and a slightly fuller, darker tone. Many intermediate and professional players prefer unfiled reeds for their tonal depth, while beginners often find filed reeds easier to start.
Reed anatomy and inspection vocabulary every player should know
Understanding the parts of a reed lets you diagnose problems quickly and communicate clearly with teachers or repair technicians.
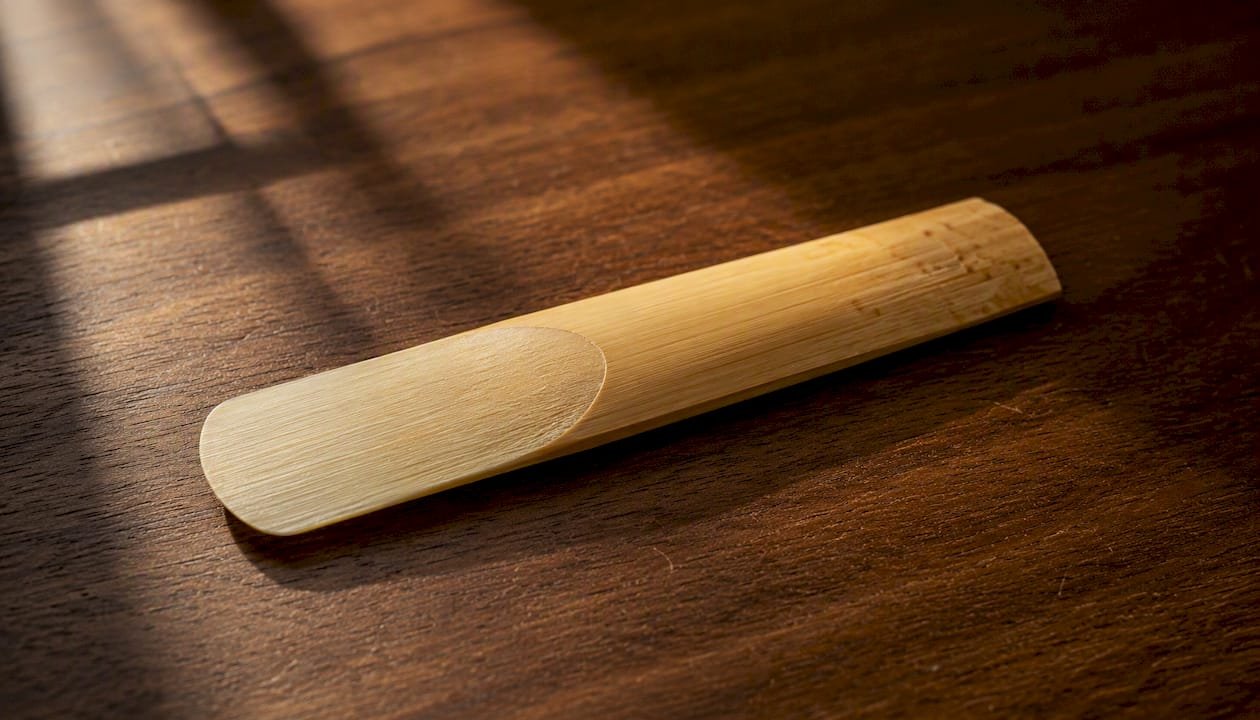
| Part | Location | Why it matters |
|---|---|---|
| Tip | Thin, curved top edge | Thinnest point; first to vibrate; chips here end a reed’s life |
| Vamp | Profiled, scraped area above the bark | Slope and length control response speed and register balance |
| Heart | Thicker central zone of the vamp | Provides stability and tonal core; too thin = airy, too thick = stuffy |
| Rails | Left and right edges of the vamp | Must be even; uneven rails cause squeaks and pitch instability |
| Bark | Unprofiled lower section | Structural; the file line marks where bark meets vamp |
| Table | Flat underside of the reed | Must be perfectly flat to seal against the mouthpiece |
The tip, vamp, heart, rails, and table each influence response and tone in distinct ways. A thick heart produces a warm, centered sound but can feel stuffy in the upper register. A thin heart opens up the clarion register but risks instability in the chalumeau. Rails that are uneven side to side cause the reed to seal improperly, producing squeaks or a lopsided tone.
Visual and physical inspection checklist:
- Hold the reed up to a light source. The vamp should show a symmetrical shadow pattern from left to right, with the heart centered.
- Check the rails: they should be straight and even in thickness from the file line to the tip.
- Inspect the tip for chips, cracks, or uneven curvature. Even a hairline chip at the tip corner changes response noticeably.
- Lay the reed flat on a glass surface or mouthpiece table. Any rocking indicates a warped table, which prevents a proper seal.
- Tap test: hold the reed by the bark and tap the tip gently with one finger. A healthy reed produces a clean, resonant ring. A dead or waterlogged reed sounds dull and flat.
- Flex test: press the tip gently with your thumb. The reed should spring back immediately and evenly. Uneven spring suggests an asymmetric vamp.
- Seal check: place the reed on the mouthpiece without the ligature and press it flat. Blow gently; you should feel no air escaping around the sides.
How environment and equipment change the way a reed feels
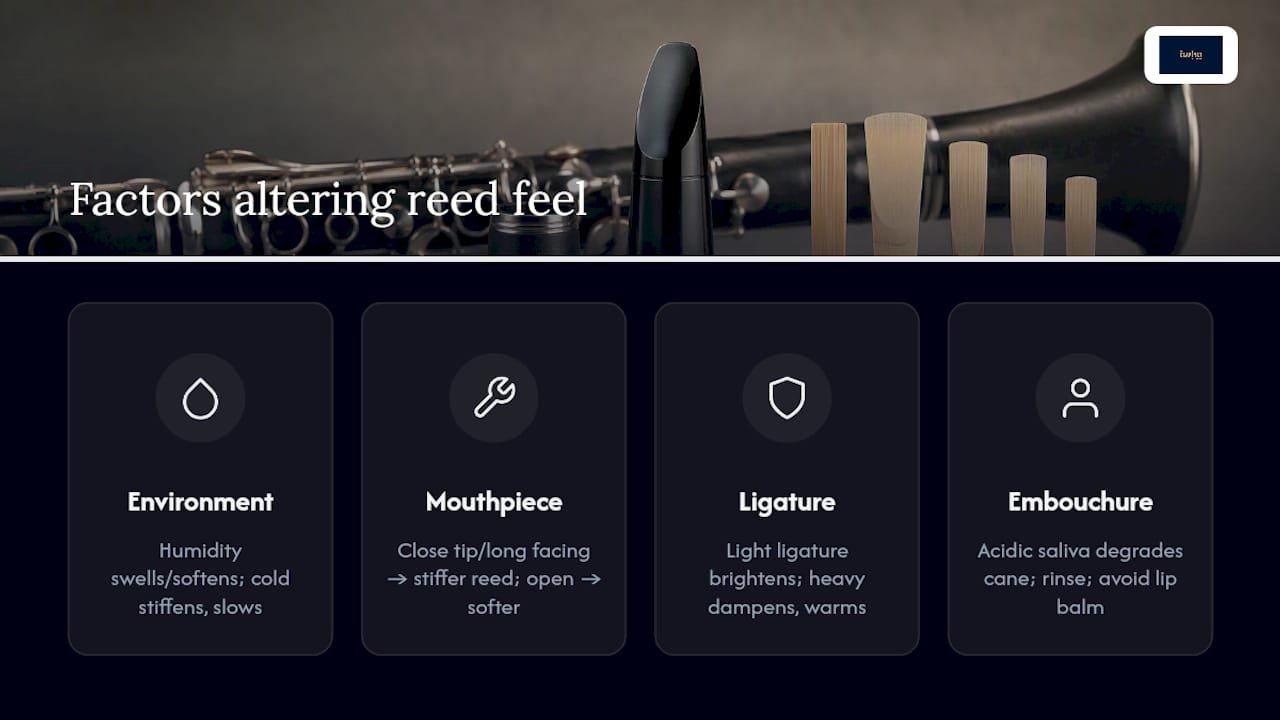
A reed that plays beautifully in your living room can feel completely different in a cold rehearsal hall or a humid outdoor venue. Cane is hygroscopic: it absorbs and releases moisture constantly, which changes its stiffness, curvature, and response. High humidity swells the fibers and softens the reed; dry conditions shrink and stiffen it. Temperature affects this further, since cold air slows the reed’s initial response until it warms up.
Altitude matters too, though less dramatically. At higher elevations, lower air pressure means the reed needs slightly less resistance to respond, which can make a medium reed feel harder than usual.
Your mouthpiece geometry is the most controllable variable. A mouthpiece with a close tip opening and long facing creates a narrow, elongated vibrating window that needs a stiffer reed to resist collapsing. An open tip with a shorter facing gives the reed more room to move, so a softer reed responds without bottoming out. The mouthpiece tip opening and facing length are the primary determinants of which reed strength will play best on your setup. For a deeper look at how tip opening measurements translate to reed pairings, the clarinet mouthpiece tip openings guide at Myclarinetstuff walks through the numbers clearly.
Ligature type and position also shift the feel. A lighter ligature (thin metal or fabric) allows more reed vibration and tends to brighten the tone. A heavier ligature (thick metal, leather) dampens vibration slightly, adding warmth and stability. Ligature position on the reed affects how much of the vamp is free to vibrate: too high, and the tone becomes thin; too low, and response slows.
Your embouchure and saliva chemistry are player-specific variables you cannot fully control, but you can manage them. Acidic saliva degrades cane faster than neutral saliva. Rinsing the reed with water after playing slows this process. Lip balm, chapstick, or any lip product transferred to the reed coats the fibers and kills response quickly.
Pro Tip: To isolate whether a problem is the reed, the mouthpiece, or your embouchure, try the same reed on a different mouthpiece (or a known-good reed on your mouthpiece). If the problem follows the reed, it’s the reed. If it follows the mouthpiece, adjust your setup. If both combinations produce the same issue, the embouchure is the variable to address.
How to choose the right reed: strengths, cuts, and a testing routine
Choosing a reed is not guesswork when you follow a short, repeatable protocol. The goal is to compare reeds on the same mouthpiece under the same conditions so the differences you hear are real.
Step-by-step testing routine:
- Warm up first. Play 5 minutes on a reed you already know before testing anything new. Your embouchure needs to be settled, not cold.
- Soak the test reed in water for 60 seconds. Place it on your mouthpiece and play a long tone in the middle register (written G or A). Note the resistance and tone immediately.
- Tonguing check. Play a scale with single tonguing at a moderate tempo. A reed that responds cleanly without squeaking or clamping is passing this test.
- Low-register response. Play chalumeau low E and F. These notes expose a reed that is too hard (stuffy, flat) or too soft (airy, sharp).
- Clarion register test. Play the throat tones and clarion C and D. A reed that is too soft will feel unstable here; one that is too hard will feel resistant and bright.
- Tuning and stability. Play a sustained note and check with a tuner. Then play a phrase and listen for pitch drift as the reed warms up.
- Document your results. Note the brand, strength, box number, mouthpiece used, and your observations. This log becomes your most useful reed-buying reference.
For matching reed strength to mouthpiece, the practical rule is: start at the manufacturer’s recommended strength for your tip opening, then adjust by half-steps based on your testing results. Never jump a full strength without testing the intermediate option first.
Filed vs. unfiled: Filed reeds respond faster and suit players who prioritize articulation clarity. Unfiled reeds offer more resistance and a fuller tone in the lower register. Many classical players prefer unfiled; jazz and folk players often lean toward filed for quicker response.
Brand guidance for U.S. players:
Many teachers recommend Vandoren Traditional 2.5 or D’Addario Organic Reserve 2.5 as reliable starting reeds for beginners. Both balance playability and consistency well.
- Vandoren Traditional: The most widely used clarinet reed in the U.S. Unfiled cut, medium-thick heart, warm and centered tone. Available in strengths 1.5–5. The Juno line (also by Vandoren) is a student-grade option at a lower price point with similar geometry.
- Vandoren V12: A thicker heel and longer vamp than the Traditional. Produces a darker, richer tone with more resistance. Favored by intermediate and advanced players who want depth in the lower register.
- D’Addario Organic Reserve: Filed cut, slightly thinner tip than the Vandoren Traditional. Responds quickly and offers good consistency across a box. A strong choice for players moving from beginner to intermediate.
- Synthetic alternatives: Polymer reeds remove the break-in ritual entirely and hold up well across humidity changes. Response and tone differ slightly from cane, but for players who travel frequently or play outdoors, the consistency advantage is real.
Does mouthpiece geometry actually determine reed strength?
Yes, and the relationship is more direct than most players realize. Tip opening and facing length are the primary variables teachers use to suggest an initial reed strength. A closer tip with a longer facing creates a tighter vibrating window; the reed needs more stiffness to resist collapsing under breath pressure. An open tip with a shorter facing gives the reed more room to move, so a softer reed responds without bottoming out against the mouthpiece table.
The practical rule: for every step you move toward a more open tip opening, drop approximately half a reed strength. This is a starting point, not a formula, because cane hardness, vamp geometry, and individual embouchure all shift the result. But it gives you a testable hypothesis rather than a random starting point.
Three steps to verify the fit with your own mouthpiece:
- Play a sustained low E (chalumeau) and a sustained clarion C back to back. Both should speak cleanly without excessive effort or airiness.
- Tongue a rapid passage (sixteenth notes at quarter = 100). If the reed clamps or squeaks, it may be too soft for your tip opening. If it feels locked and resistant, try a half-step softer.
- Check tuning on both registers with a tuner. A reed that is too hard for your mouthpiece tends to push the clarion register sharp; one that is too soft pulls the chalumeau flat.
Pro Tip: When reed feel conflicts with tone goals (you want a darker sound but the softer reed feels unstable), try a different cut rather than a different strength. A V12 at the same strength as your current Traditional will feel more resistant and produce a darker tone without requiring you to jump to a harder reed.
For a detailed breakdown of how specific tip opening measurements map to reed strength ranges, the mouthpiece and reed interaction guide at Myclarinetstuff covers the numbers by mouthpiece model.
How to break in new reeds without damaging them
Breaking in a reed is not optional. Cane fibers need gradual hydration and use to close and stabilize; skipping this step produces reeds that warp, go dead quickly, or never play consistently. The break-in process helps the cane fibers close and stabilize, improving both longevity and playability.
Day-by-day break-in schedule:
- Day 1: Soak the reed in clean water for 30–60 seconds. Play for 5 minutes only, then remove the reed, pat it dry rails-to-tip, and let it air-dry flat on a clean surface. Do this with 2 reeds.
- Days 2–3: Soak for 60 seconds. Play each reed for 10–15 minutes, then dry and rotate. Avoid long, intense sessions. Add a third reed to the rotation.
- Days 4–5: Extend sessions to 20–30 minutes per reed. Add your fourth reed to the rotation. By now, each reed should be stabilizing in feel and tone.
- Day 6 onward: All four reeds are in active rotation. Use them in normal practice and performance.
Use plain water for soaking during the first 72 hours. Saliva introduces enzymes and acids that can accelerate fiber breakdown in new cane. A brief rinse after each session removes residue and slows degradation.
Pro Tip: Label each reed with a pencil number on the bark (1–4) and rotate them in order. This prevents you from accidentally overplaying one reed while another sits unused. After two weeks, you’ll know which reeds in the box are keepers and which to retire.
How to care for and store reeds to extend their life
Daily care is where most players lose reed life unnecessarily. The routine takes under two minutes and makes a measurable difference in how long a reed stays playable.
Daily care steps:
- After playing, remove the reed from the mouthpiece immediately. Never leave a reed clamped under the ligature between sessions.
- Rinse the reed briefly under cool water to remove saliva residue.
- Pat dry gently with a clean cloth, moving from the rails toward the tip (never tip-to-rail, which can lift fibers).
- Let the reed air-dry completely on a flat, clean surface before storing. Storing a damp reed in a closed case promotes mold.
Humidity control is the most underrated part of clarinet reed care. Below that range, they dry out, warp, and crack. Above it, they swell and go soft. A hygro case with a built-in humidity indicator lets you monitor conditions at a glance.
| Storage method | Humidity control | Reed protection | Approximate cost |
|---|---|---|---|
| Basic reed guard (flat) | None | Keeps reed flat, prevents warping | $5–$15 |
| Hygro reed case | Passive (indicator only) | Flat storage + humidity monitoring | $20–$40 |
| Boveda pack + case | Active two-way control | Best humidity stability | $10–$20 (pack + case) |
Rotating 3–4 reeds extends usable life by giving each reed time to dry fully between sessions. A reed played every day without rest degrades faster than one used every other day. Tracking which reeds you rotate and noting when each was first played helps you predict replacement timing and maintain a consistent performance-ready pool.
Avoid these common mistakes:
- Leaving reeds on the mouthpiece between sessions (warps the table and tip)
- Storing reeds in a closed case while still damp (causes mold)
- Applying lip balm or chapstick before playing (coats fibers, kills response)
- Over-soaking (more than 2–3 minutes softens the tip excessively)
Placement and assembly: how to mount a reed correctly
Correct reed placement affects response, pitch, and register balance. A reed mounted even a fraction of a millimeter too high or too low changes how the instrument speaks across registers. Small vertical adjustments of the reed on the mouthpiece can improve response and pitch without altering the reed itself.
Safe assembly order:
- Moisten the reed thoroughly before mounting. Dry cane is brittle; sliding a dry reed onto the mouthpiece risks chipping the tip.
- Slide the reed onto the mouthpiece table from below, moving it upward slowly. Never press the tip against a hard surface.
- Position the reed so the tip aligns just below the mouthpiece tip rail. The standard reference is the “visual sliver” method: looking at the mouthpiece from the front, you should see a hair-thin sliver of the mouthpiece tip rail above the reed tip. If the reed tip is flush with or above the mouthpiece tip rail, the reed is too high.
- Place the ligature over the reed and mouthpiece. Tighten the screws to finger-tight only; over-tightening restricts vibration.
Alignment checklist for rehearsals:
- Reed centered left-to-right on the mouthpiece table (rails equidistant from the mouthpiece side rails)
- Reed tip just below the mouthpiece tip rail (visual sliver visible)
- Ligature positioned on the bark, not on the vamp
- Ligature screws tightened evenly (if two screws, tighten both equally)
- No gap visible between the reed table and the mouthpiece table when viewed from the side
Ligature height matters more than most players acknowledge. A ligature positioned too high on the vamp restricts the vibrating area and produces a thin, constricted tone. Too low on the bark, and the ligature may slip or fail to hold the reed securely. The sweet spot is typically just above the file line, on the bark.
Simple adjustments and safe repairs: sanding, paring, and clipping
Most reed problems can be addressed with conservative micro-adjustments. The cardinal rule: make one small change, then play-test before making another. Over-correction is irreversible.
Tools and their purposes:
| Tool | Purpose | Safety note |
|---|---|---|
| Reed knife | Tip thinning, vamp profiling | Keep extremely sharp; dull knives require more pressure and slip |
| Fine sandpaper (600 grit) | Rail flattening, table smoothing | Use a flat glass surface as a backing; circular motion warps the table |
| Reed file | Vamp thinning, tip work | Gentler than a knife; good for beginners |
| Reed clipper | Removing chipped tips | Clips 0.5mm at a time; re-test after each clip |
| Beveler | Rounding the tip after clipping | Prevents sharp edges that cause squeaks |
Safe paring and sanding steps:
For a reed that feels too hard or stuffy, lightly sand the rails on a flat glass surface using 600-grit sandpaper and a circular motion. Two or three passes are usually enough. Play-test immediately. If the reed still feels stiff, sand the heart area lightly with the reed file, working symmetrically from the center outward. Never thin the tip with sandpaper; use a reed knife or file for tip work only.
For a chipped tip, a reed clipper can remove the damaged section cleanly. Clip in 0.5mm increments and re-test after each clip. A beveler or fine sandpaper smooths the new edge. A reed clipped more than 1mm loses its original profile geometry and will likely need to be retired.
Pro Tip: Before any adjustment, mark the reed’s bark with a pencil to record what you changed and when. If the adjustment makes things worse, you have a record to reference. A conservative approach, one micro-adjustment followed by a full play-test, is the safest path. Over-correcting is irreversible.
When to stop and replace: retire a reed when it shows black mold spots, cracks running into the vamp, or a mushy feel that does not recover after drying. No adjustment fixes structural failure.
Making clarinet reeds by hand: what it involves and whether to try it
Hand-making reeds is a craft that takes months to learn and years to refine. Understanding the process helps you appreciate why factory reeds vary and what professional profiling actually does. The basic workflow moves through tube selection, gouging, profiling, shaping, and finishing.
Core steps and time investment for beginners:
- Tube selection: Choose Arundo donax tubes with consistent wall thickness and no visible cracks. A beginner spends 10–20 minutes per session learning to identify good cane by eye and feel.
- Gouging: A gouging machine removes the inner bark to a consistent thickness. This step alone takes 30–60 minutes per tube for a beginner and requires a specialized machine ($300–$800+).
- Profiling: A profiling machine or hand tools shape the vamp geometry. Symmetry here determines everything about the finished reed’s response. Beginners typically spend 20–40 minutes per reed on this step.
- Shaping: A shaper cuts the reed blank to the correct outline. This step is fast (5 minutes) but requires a precise shaper tool.
- Finishing: Hand-scraping and sanding refine the tip, rails, and heart. This is where experienced reed makers distinguish themselves; a beginner may spend 30–60 minutes per reed here.
Common first-timer pitfalls:
- Asymmetric profiling (one rail thicker than the other)
- Over-thinning the tip before the heart is balanced
- Rushing the drying time between finishing steps
Hand-making is worth the investment if you have specific tonal needs that no factory reed meets, or if you want a deep understanding of reed physics for teaching purposes. For most players, buying factory reeds and learning to select and adjust them well produces better results faster.
Common reed problems and how to diagnose them quickly
Most reed problems fall into a short list of recognizable patterns. Before replacing a reed, run through this quick diagnostic.
Dead or muffled tone: The reed has lost its responsiveness. First, check whether it is waterlogged (remove it, pat dry, and let it rest for 24 hours). If the tone does not recover after drying, the reed has reached the end of its usable life. Signs that a reed should be replaced include a mushy feel, poor response, cracks, mold, and pitch instability.
Squeaking: Usually caused by an uneven seal between the reed and mouthpiece. Re-seat the reed, check alignment (visual sliver method), and verify the ligature is not over-tightened. A chip on the tip rail is another common cause; inspect under good light.
Pitch instability or drift: If the reed plays sharp as it warms up, it may be too hard for your mouthpiece. If it plays flat and goes soft, it may be too soft or waterlogged. A reed that drifts unpredictably across a session is often at the end of its life.
Sticky or warped reed: A reed that sticks to the mouthpiece table has a warped table. Lay it flat on glass and let it dry fully. Light sanding of the table on a flat surface (circular motion, 600-grit) can restore flatness. If the warp is severe, retire the reed.
Mold: Black or green spots on the vamp or bark indicate mold from improper drying. A reed with mold spots in the vamp should be retired immediately. Mold on the bark only, away from the playing surface, is less critical but signals poor storage habits.
When environment is the cause: If multiple reeds in your rotation suddenly feel different on the same day, the environment changed, not the reeds. Check humidity and temperature. A Boveda pack in your reed case stabilizes the microenvironment and prevents these sudden shifts.
Track reed life by noting the date each reed entered rotation and how many hours it has been played. Most cane reeds last 2–4 weeks of regular practice before response degrades noticeably.
Practical product recommendations for U.S. players
The reeds and accessories below are widely available at U.S. retailers and online, with price ranges reflecting typical street prices.
Beginner reeds:
- Vandoren Traditional 2 or 2.5 (unfiled): The standard recommendation for beginners in most U.S. school programs. Consistent, warm, and forgiving. A box of 10 typically runs $25–$35. The Juno by Vandoren is a student-grade alternative at a lower price point with similar geometry, well-suited for players just starting out.
- D’Addario Organic Reserve 2.5 (filed): Slightly faster response than the Traditional, good consistency across a box. Around $25–$35 for 10. Teacher-recommended alongside the Vandoren Traditional as a reliable starting point.
- Synthetic option: Polymer reeds from established manufacturers offer no break-in, long life, and consistent feel across humidity changes. Price per reed is higher upfront but lower over time. A practical choice for beginners who travel or play in variable conditions.
Intermediate and advancing players:
- Vandoren V12 3 or 3.5: Darker tone, more resistance, longer vamp. A natural step up from the Traditional for players developing a fuller sound. Around $30–$40 for a box of 10.
- D’Addario Organic Reserve Classic 3 or 3.5: Thicker blank than the standard Reserve, closer to the V12 in feel. Good for players who want the Reserve’s response with more tonal depth.
Accessories that extend reed life:
- Boveda 49% or 62% humidity packs: Two-way humidity control; place one in your reed case and replace every 2–3 months. Available at most U.S. music retailers for $5–$10 per pack.
- Hygro reed case: Combines flat storage with a humidity indicator. Brands like D’Addario and Vandoren both make reliable versions in the $20–$40 range.
- Reed guards (flat): Basic flat storage that prevents warping. Inexpensive ($5–$15) and a significant upgrade over leaving reeds loose in a box.
For a curated selection of clarinet accessories that complement your reed setup, Myclarinetstuff carries options suited to students through professionals.
What I tell every student about reeds
The advice I give students most often comes down to three things: rotate your reeds, match your reed to your mouthpiece before adjusting anything else, and make one conservative change at a time.
Most reed frustration comes from players who buy a box, grab the first reed, play it until it dies, and then blame the brand. Rotation is the single habit that separates players who always have a good reed from those who are constantly chasing one. Three or four reeds in active rotation, broken in properly and stored with humidity control, give you a stable pool to draw from every day.
The mouthpiece-to-reed match matters more than brand loyalty. A great reed on the wrong mouthpiece will always underperform a good reed on the right one. At Myclarinetstuff, we see this constantly: players who switch to a Gleichweit mouthpiece with a tip opening matched to their playing style often find that their existing reeds suddenly work better, because the geometry is finally aligned. The mouthpiece matchmaker service exists precisely for this: to help you find the setup where your reed and mouthpiece work together rather than against each other.
Conservative adjustments save reeds. One light pass with sandpaper on the rails, followed by a full play-test, is the right approach. Players who sand aggressively or pare deeply in one session regularly ruin reeds that a lighter touch would have saved.
Guided mouthpiece and reed matching through Myclarinetstuff
Getting the mouthpiece and reed pairing right is the fastest way to improve your sound, and it does not have to be a process of expensive trial and error. Myclarinetstuff’s Clarinet Mouthpiece Matchmaker walks you through your playing profile, style, and current setup to recommend a Gleichweit mouthpiece with the tip opening and facing geometry that suits your reed strength and playing goals.

The at-home test box program takes it further: try a Gleichweit mouthpiece in your own practice space, on your own reeds, before committing. That real-world test eliminates the guesswork that comes with buying a mouthpiece based on a spec sheet alone. Gleichweit mouthpieces are CNC-crafted in Austria to tight tolerances, which means the tip opening you select is the tip opening you get, every time. Visit the Myclarinetstuff shop to explore available mouthpieces, barrels, and accessories, or start with the matchmaker to find your ideal setup.
Sources
- Raisin’ Cane: Clarinet Reeds – Facts and Fiction – Band Director Media Group
- The Anatomy of a Reed | Sage Music
- An Overview of Making Clarinet Reeds by Hand
- Clarinet reed guide
- Correct reed placement and ligature positioning | Yamaha
- Best Clarinet Reeds for Beginners – Clarinet Geek